Create a project & API keys
Project Setup, Install (AI / Manual / Import), Verify, Billing, and managing API keys in Settings → Environments.
What is a project?
A project is one product you measure. Examples: “Marketing website”, “SaaS app”, “Staging copy of SaaS”.
- Data from project A never appears in project B.
- Teammates are invited per project (Settings → People).
- Each project has its own API keys.
If you are brand new: create one project for the app you will install today. Add a second project later for staging if you want clean separation.
What is an API key?
An API key is a secret string. The SDK includes it with every request so HumanBehavior knows which project should store the data.
Security rules (non-negotiable)
- Put keys in environment variables (
.env.local, Vite env, etc.). - Never commit keys to git.
- Client-side keys can still be extracted from the browser — treat them as “can send data into my project,” not as admin passwords.
- If a key leaks, Rotate key or Delete key in Settings → Environments and create a new one.
Path A — First-time in-app onboarding
When you first create an account/project, HumanBehavior walks you through get-started routes.
Gate before Project Setup
New accounts hit Welcome & user profile (/get-started/user) first. After that, the top bar steps are:
- Project Setup
- Install
- Verify
- Billing
Top-bar actions (after user onboarding): Invite teammate, Need help? → Documentation (docs.humanbehavior.co), Watch video tutorial (YouTube). Book a call in that menu currently only closes the dropdown (no booking URL).
Step: Project Setup (/projects/:id/get-started/project)
Header: Project Setup — Set up your workspace details.
| Field | Required | Notes |
|---|---|---|
| Project logo | No | Upload logo / remove; PNG, JPEG, GIF under 10MB |
| Name | Yes | Placeholder e.g. Human Behavior; enables Next |
| Project ID | — | Read-only unique identifier with Copy project ID |
| Project URL | No | Placeholder https://myapp.com |
If your account email has a company domain, a checkbox appears:
Allow anyone with
@{domain}email to join this project
the checkbox is shown and toggled in the UI, but Next only saves name and url — the domain-join flag is not sent with that save.
If you arrived via the CLI wizard with ?wizardCode=…, a notice appears: You’re setting up the CLI install flow…
Next / Saving… → loads an API key into session storage → /get-started/sdk (preserves wizardCode if present).
Step: Install (/get-started/sdk)
Header: Install — Set up takes less than 5 minutes. plus Confused? Watch a video tutorial (YouTube).
Connection status chip (top-right while on Install):
| State | Label |
|---|---|
| Waiting | Scanning for connection (pulsing) |
| Connected | SDK connected |
The page polls for SDK events (~1s). Next stays disabled until the SDK is connected. Skip Step is available only while not connected.
Install mode tabs
Three tabs under Instructions:
| Tab | Label |
|---|---|
ai | Install with AI |
manual | Install manually |
existing | Import existing data |
1. Install with AI
-
Copyable wizard command (click field or copy control — tooltip Copy command / Copied):
npx @humanbehavior/wizard@latest --dashboard-url {origin} --project {slug}(
proj-prefix is stripped from the project id for--project.) -
Chip row: frameworks the AI installer can detect — React, Next, Vue, Angular, Svelte, Nuxt, Remix, Astro, Gatsby, HTML.
-
Help note: To finish scanning, open your app and click around locally, or deploy it to start recording real users.
-
Installation options menu:
- Install manually — switches to Manual tab
- Import existing data — switches to Import tab
- Book a call — navigates to
/demo
Also see the dedicated CLI wizard doc.
2. Install manually
Grid of framework cards. Clicking a card opens the Install manually modal with copy-paste steps for that stack.
| Card id | Name shown |
|---|---|
react | React |
nextjs | Next |
vuejs | Vue |
angular | Angular |
svelte | Svelte |
nuxtjs | Nuxt |
remix | Remix |
astro | Astro |
gatsby | Gatsby |
html | HTML |
Deep framework copy-paste detail: Manual install.
3. Import existing data
Panel: Import data from existing tools.
Tool chips:
| Chip | Status |
|---|---|
| PostHog → | Active — opens PostHog setup |
| Sentry, Datadog, FullStory, LogRocket | Shown but disabled (inactive) |
PostHog fields (when PostHog is open)
Guided steps 1–5 in the UI, then:
| Field | Placeholder / help |
|---|---|
| API Key | phx_your_api_key_here |
| Host URL | Default us.posthog.com — enter without https:// |
| Project ID | e.g. 123456 — from PostHog URL /project/[ID] |
Actions: Connect PostHog / Connecting... / Reconnect PostHog; link Open PostHog API keys; Back to the tool list.
Success: Connected to {name}. Imports will start shortly.
Skip Step reasons
Skip Step opens Skip setup? with:
| Reason (label) | What happens |
|---|---|
| I don't have the credentials or access to connect. | Opens Invite modal; on close → Billing |
| I have a security or pricing question. | Opens founder Cal.com, then → Billing |
| I would like to see a demo. | Opens founder Cal.com, then → Billing |
| I'm having trouble connecting. | Opens founder Cal.com, then → Billing |
| I want to try with demo data. | Goes to Billing (no Cal.com) |
| Cancel | Closes modal |
When connected, Next advances to Verify (?step=verify).
Step: Verify (?step=verify)
Header: Verify — Confirm events are flowing from your product. Shows LIVE when connected.
Live event table + live replay preview. Primary CTA: Looks good (enabled when connected) → Billing (also marks billingReached).
Details: Verify data is flowing.
Step: Billing (/get-started/billing)
Full control map (cycles, $500 / $1000 / $2500 plans, annual gifts, Skip trial, payment modal): Billing.
Path B — You already have a project
- Open the project.
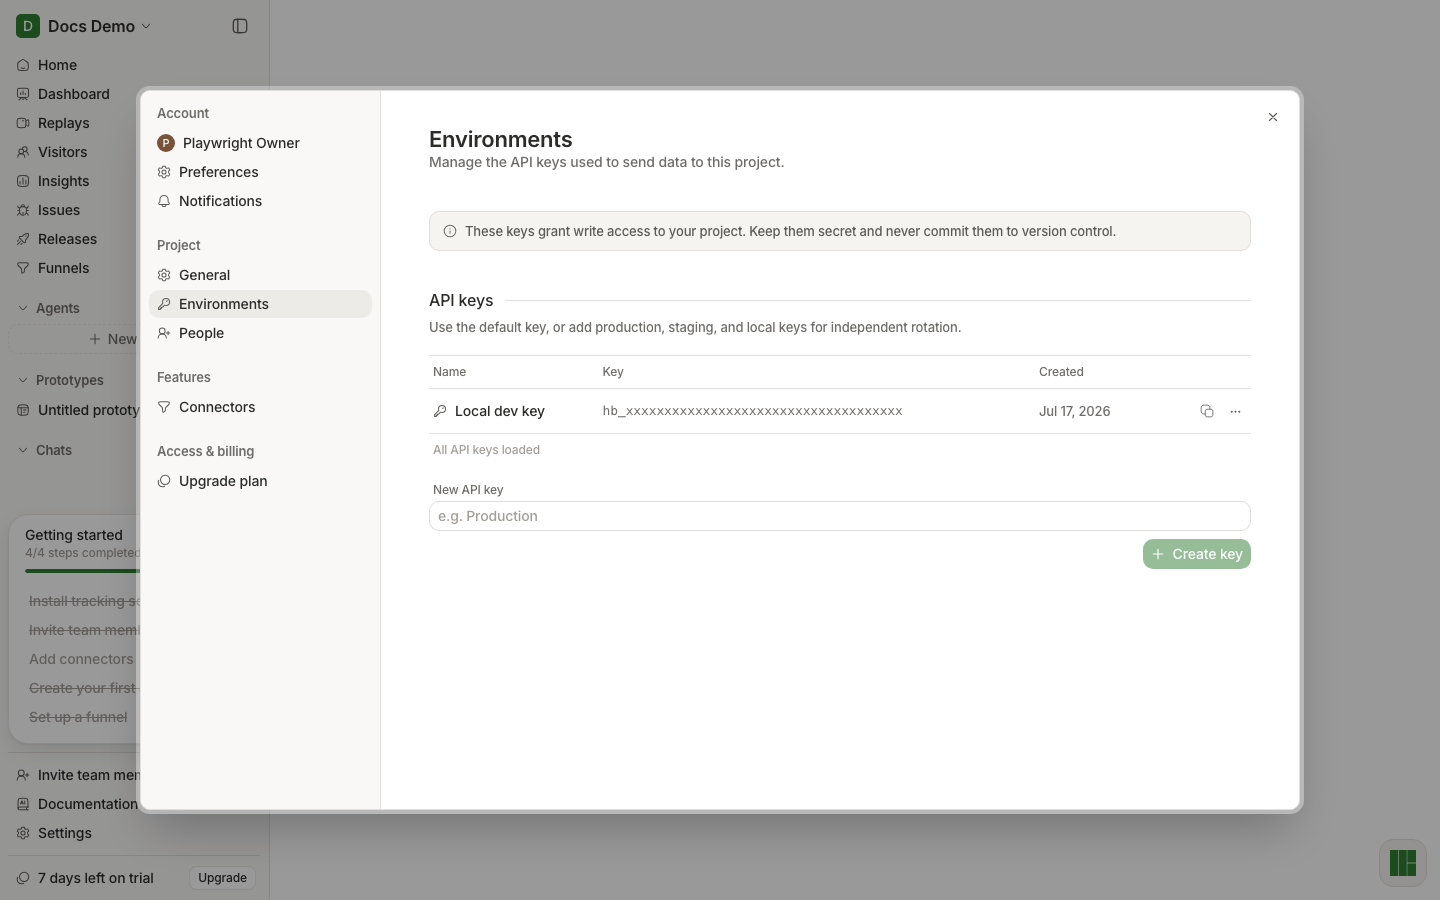
- Click Settings (gear) in the sidebar → opens the settings modal.
- Open Environments (under Project).
- If empty: No API keys yet. Create one below to start sending data.
- Enter a name under New API key → Create key / Creating…
- Per key: copy, overflow menu → View key / Hide key, Change name, Rotate key, Delete key
- Footer: All API keys loaded
Environment variables to set in your app
| Framework family | Variable name |
|---|---|
| Next.js (client) | NEXT_PUBLIC_HUMANBEHAVIOR_API_KEY |
| Vite | VITE_HUMANBEHAVIOR_API_KEY |
| Nuxt public | NUXT_PUBLIC_HUMANBEHAVIOR_API_KEY |
| Astro public | PUBLIC_HUMANBEHAVIOR_API_KEY |
| Gatsby | GATSBY_HUMANBEHAVIOR_API_KEY |
| Generic | HUMANBEHAVIOR_API_KEY |
Optional ingestion host override (local stacks):
| Variable | Example |
|---|---|
NEXT_PUBLIC_HUMANBEHAVIOR_INGESTION_URL | http://localhost:8000 |
Do not point ingestion at the dashboard origin unless you already proxy /api/ingestion/*.
Environments vs “environment” option in the SDK
- Settings → Environments / API keys: separate keys (often one for local, one for production).
- SDK
options.environment: a string tag on events (e.g.production) used in Issues filters and release health.
Best practice: use a dev key for local work and a prod key for production deploys. Also set environment in init to match.
Empty / error states
| What you see | What it means | What to do |
|---|---|---|
| No API keys yet | Brand new project | Create key |
| Installation still in sidebar | Onboarding incomplete | Finish Install → Verify → Billing (or skip where allowed) |
| Installation link gone | Install considered complete | Use Settings for keys |
| Key create fails | Network/auth issue | Refresh, re-login, retry |
Sidebar notes
| UI | Status |
|---|---|
| Getting started → Add connectors | Listed but inactive (not clickable) |
| Sidebar 7 days left on trial → Upgrade | Visual row; Upgrade button has no navigation handler |